When it comes to preparing new brass for loading and shooting in our rifles, it’s essential to take a few steps to ensure consistency and avoid potential headaches down the road. While many high-end brass manufacturers today produce excellent brass that may require little to no preparation, there are still situations where a bit of extra work can make a big difference.
Why Prepare New Brass?
Sometimes, new brass arrives with slightly dented necks or tighter neck dimensions than what we’d like after resizing. Additionally, overly clean brass can increase seating force, leading to issues like inconsistent seating depth or damage to the bullet itself. To achieve the best results, we’ve developed a straightforward process to set up new brass for optimal performance and minimize seating pressure.
Our Step-by-Step Process for New Brass Preparation
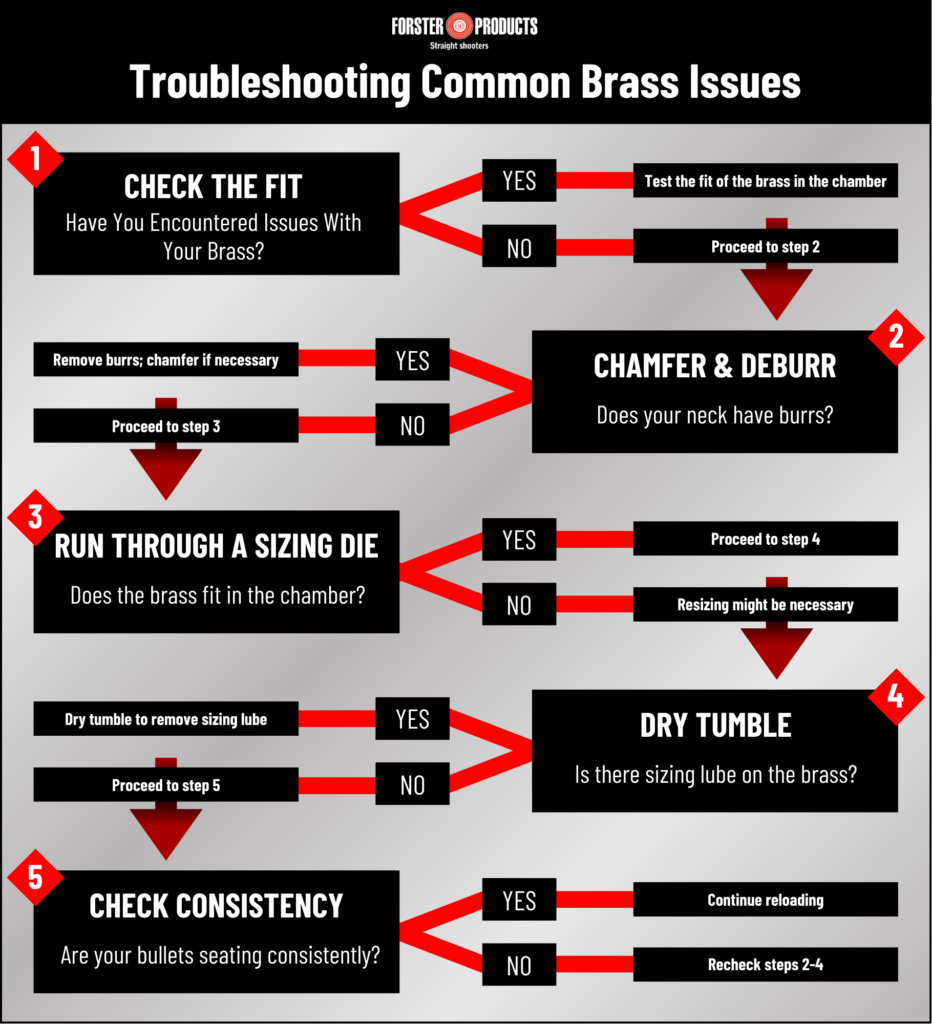
- Check the Fit:
- Most new brass is manufactured small enough to fit both factory-cut and custom chambers. However, it’s a good idea to confirm this by testing the fit in your chamber before loading. If your brass doesn’t fit due to being out of spec or having a tight chamber, resizing may be necessary.
- Chamfer and Deburr:
- Inspect the necks for burrs before sizing. If left unchecked, burrs could weld themselves onto the sizing die resulting with a damaged sizing die.
- Run Through a Sizing Die:
- Set up your sizing die to just touch the shoulder without moving it back any further. This step ensures the necks are uniform, fixes any dents, and sets the final neck tension to match that of fired and resized brass.
- Dry Tumble:
- Use a dry tumbler with dry media (e.g. corn cob media) to remove the sizing lube. We don’t want sizing lube in the chamber when we shoot the brass.
- The dry tumbling will also act as a dry lubricant to aide in reducing the force it takes to seat a bullet. This is crucial step to lowering seating pressure.
- Alternate Methods:
- Instead of using a full-length sizing die, you can opt for a neck sizing die or an expander mandrel to set your desired neck tension. The rest of the process—chamfering, deburring, and tumbling—remains unchanged. Since new brass is generally manufactured small enough to fit most chambers, there’s typically no need to resize the body. However, it’s crucial to confirm this by testing the fit of the virgin brass in your chamber and ensuring the bolt closes smoothly before moving forward.
The Results
While it’s true that new brass can often be loaded and fired without any preparation, skipping these steps may result in higher seating force and bullet imperfections. At Forster, we frequently hear from customers experiencing these issues. Through our testing, we’ve found that preparing new brass with this process significantly reduces seating force and improves consistency in reloads.
Taking the extra time to properly prepare your brass now can save you from future frustration and help you achieve the accuracy and performance you’re aiming for.
If you have any questions or need assistance, feel free to reach out to our team.